By Kelvin Sim
Introduction
Conversion rate is an online marketing key performance indicator. As we have mentioned in our previous blog post – 3 Easy Google Analytics Reports To Help You Improve Your Conversions Google Analytics (GA) is a free website analytics service offered by Google that provides you with data that will help your improve your websites content, elevate user experiences and increase your conversions.
In order to increase conversion rates, it’s important to have a full understanding of who your visitors are, where they’re coming from, and what they do once they arrive on your site. This can be done by examining the reports produced by GA.
However, with the right set-up, GA can also be your most powerful conversion rate optimisation (CRO) tool. In this blog post, we will provide you a step-by-step guide to setting up 4 goal types in GA, but firstly, what is a goal in GA?
Goals in GA
Goals in GA allow you to track specific user interactions on your site. This has been discussed in another one of our blog post – Your Guide To Everything You Need To Know About Conversion Rates these goals should reflect your business goals and may include a product being purchased creating a sale for your Ecommerce store.
However, it may also include an aggregate goal, where you assign average values for specific criteria on your website that can provide valuable insight. This may include the average time a user is only your website or the number of pages a user visits – more on that later.
Therefore, it is imperative to configure your goals in GA as this will provide you with critical information that will contribute to your conversion rate and ultimately contribute to the success of your business.
Types of Goals in GA
Goals in GA will typically fall into one of these categories.
- Destination: Specific URL loads. For example, this could be a ‘Thank you for purchasing our product’ webpage
- Duration: Sessions that last a specific amount of time or longer. For example, this could be 5 minutes or longer on a blog post.
- Pages/Screen per session: A user views a specific number of pages during their visit. For example, this could be tracking 5 subsequent pages prior performing a desired action on your website.
- Event: An action defined by an ‘Event’ is triggered. This could be a click or a sharing specific content on your website.
In the next section, we will show you how to set up each of these goal types in GA. But firstly, to set up a specific goal in GA you must firstly navigate your way through the GA dashboard and here is how you do it.
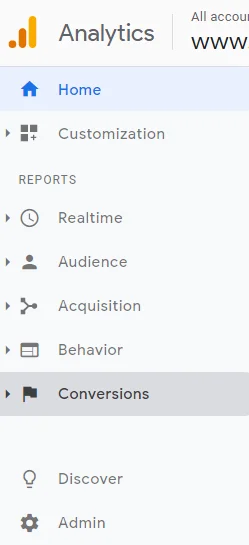
Step 1. Click on the ‘Admin’ on your GA dashboard.
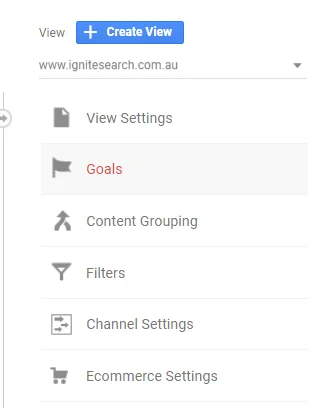
Step 2. Click on the ‘Goals’ section under the ‘View’ column.
Step 3. Click ‘+New Goal’.

Step 4. Select ‘Template’ and name your goal.

Destination Goals
These goals track when a user arrives on a specific page during their visit on your website.
For example, this goal can track the number of people that lands on a thank you page, add to cart page or even a purchase completion page.
How to set up a Destination Goal in GA
Step 1. Click ‘Destination’

Step 2. Identify your URL.

When it comes to the URL match types ‘Equal to’, ‘Begins with’, and ‘Regular expressions’, make sure to choose the one that best fits your needs.
If this is one specific URL that you want to track, choose ‘Equals to’.
Optional Steps
Value: Toggle on the value option if you want to assign a specific monetary value to the conversion. This is most helpful if you are tracking Ecommerce transactions

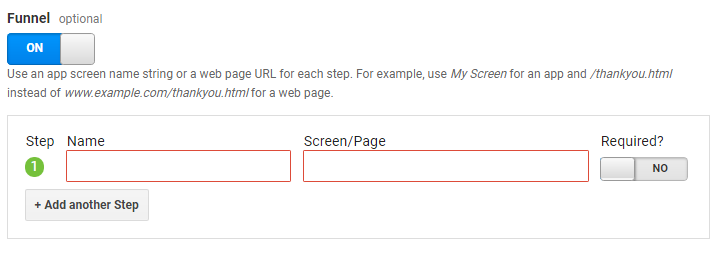
Funnel: Toggle on the funnel option if you expect your visitors to follow a certain path after landing on the URL you have specified in Step 2.
Verify Goal: Click ‘Verify this Goal’ if you want to know how often your goal would have converted based on the past 7 days of GA data.
Step 3. Click ‘Save’.

Duration Goals
These goals are much simpler compare to the previous goal – Destination. With it you can track how long your website visitors stay on your website before leaving.
How to set up a Duration Goal in GA
Step 1. Click ‘Duration’ and ‘Continue’

Step 2. Specify the duration parameters

At this stage, you will be able to define the length of time you want to track.
For example, you may want to measure how many visitors stay on your website for more than 5 minutes.
Optional Steps
Value: Toggle on the value option if you want to assign a specific monetary value to the conversion. This is most helpful if you are tracking Ecommerce transactions

Verify Goal: Click ‘Verify this Goal’ if you want to know how often your goal would have converted based on the past 7 days of GA data.
Step 3. Click ‘Save’
Pages/Screen per session Goals
These goals allow you to track the number of pages each website visitor views before leaving your website.
Step 1. Click ‘Pages/Session per session’ and click ‘Continue’

Step 2. Specify the number of pages per visitor you would like to track.

For example you may want to set a total of 5 pages to track.
Optional Steps
Value: Toggle on the value option if you want to assign a specific monetary value to the conversion. This is most helpful if you are tracking Ecommerce transactions

Verify Goal: Click ‘Verify this Goal’ if you want to know how often your goal would have converted based on the past 7 days of GA data.
Step 3. Click ‘Save’

Event Goals
These goals are useful for tracking specific interactions on your website.
These interactions are not track by GA by default so before setting up an Event goal, you must first track an event.
Event tracking leverages a custom code snippet that you would need to add to the element you would like to track on your website such as buttons, videos, images, podcasts and more.
After finalising the events your would like to track, you should proceed with creating an Event goal with the steps listed below.
How to set up an Event Goal in GA
Step 1. Click ‘Event’ and ‘Continue’

Step 2. Specify the details of your goal.

Category: The name your supply as a way to group objects you want to analyse. For example forms.
Action: Typically these goals will require an action parameter. For example it could me a submission.
Optional Steps
Label: You can provide additional information for events that you want to analyse, such as movie titles in videos, or the names of downloaded files.
Value: You can assign a numerical value to a page object, specific playback marker is reach on a video player, the number of downloads, even monetary value
Event Value: Toggle on the value option if you want to assign a specific monetary value to the conversion. This is most helpful if you are tracking Ecommerce transactions

Step 3. Click ‘Save’

Once you’ve completed the steps above, your goal conversions and value will automatically be reported in the right-hand column of your ‘Acquisition’ screens.
If you have set up multiple goals, you can also choose the individual goals you would like GA generate reports for.
Conclusion
CRO is important because it helps you understand how your online visitors navigate through your website and the interactions they take place during their visit. GA is capable of providing you with the data to comprehend your visitor’s behaviour and characteristics. Furthermore, GA enables you to set up and configure conversion goals that would enhance your CRO activities. Leveraging goals and conversions in GA will lay the foundations to a successful CRO strategy and will contribute to the growth of your business.


