Change is constant when it comes to the digital aspects of business and the need to rebrand or redesign the structure of your online consumer journey is almost unavoidable. It’s common for this to be achieved through switching up your content management system (CMS) platform, which can be carried out by a range of different professionals.
One thing to keep in mind when deciding to migrate your website is that search engines like Google have a tendency to be quite harsh against any major website change, specifically when it’s to do with your URLs. In all fairness, who can blame them for doing so? It’s an unrealistic expectation for search engines to detect the similarities between store.example.com and example.com, even though they might be the same brand.
Without recognising this, many changes in a domain can result in large losses of both traffic and rankings, it’s therefore crucial to make sure these changes can be effectively understood by search engines.
Luckily, there’s a completely dedicated industry to understanding search engines like Google and how they can help you avoid losing your traffic and keyword rankings. This is the SEO industry. In part 1 of this blog series, we go through everything to consider when preparing for an SEO migration.
Data Collection
One of the most common mistakes made during a website migration is a lack of detailed planning; on top of underestimating the attention to detail required to ensure the entire scope of work is covered. Essentially, you’ll want to set the right objectives across an estimated timeline, this can be done by using a checklist of everything that needs to happen.
You’ll want to begin with collecting current data for future analysis and references. A variety of tools can be used for this. We recommend using tools such as Google Analytics or SEMrush.
Make A Copy of Your Website
Testing and revising each change you make is crucial in a migration, you will therefore need to make a copy of your website that will be uploaded to an entirely new server. It’s generally best practice to test a website on a different domain or subdomain so that it can be compared to the old version and adjust it prior to launch.
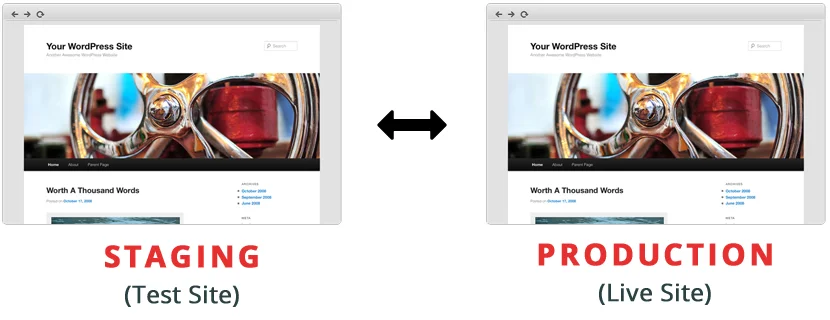
Don’t forget, if you’re using a content delivery network (CDN), set this up for the test site as well.
Block All Access
One of the more important steps is preventing search engines from accessing and indexing the newer version of your website prior to the completion of the migration. If search engines have access, then it may appear within the search engine results pages (SERPs) and compete with your current live version.
In order to do this, a robots.txt file will need to be implemented. This file is an easy way of letting search engines know to not crawl the website, but ensure access is granted to the tools that will be used during the migration. The following format can be used to do so:
User-agent: [user-agent name]
Disallow: [URL string/directory not to be crawled]
Otherwise, another way to block access to the website being developed is using a noindex tag. This can be done by placing the following meta tag into the <head> section of your page:
<meta name=”robots” content=”noindex”>
However, you should be aware that some search engine web crawlers might interpret the noindex directive differently. As a result, it is possible that your page might still appear in results from other search engines.
Checking New Website for Errors
Prior to launching up your new website, you should always check for any technical errors that may be occurring. A great tool to use for this is the SEMrush Site Audit, which scans each of your pages for all types of errors.
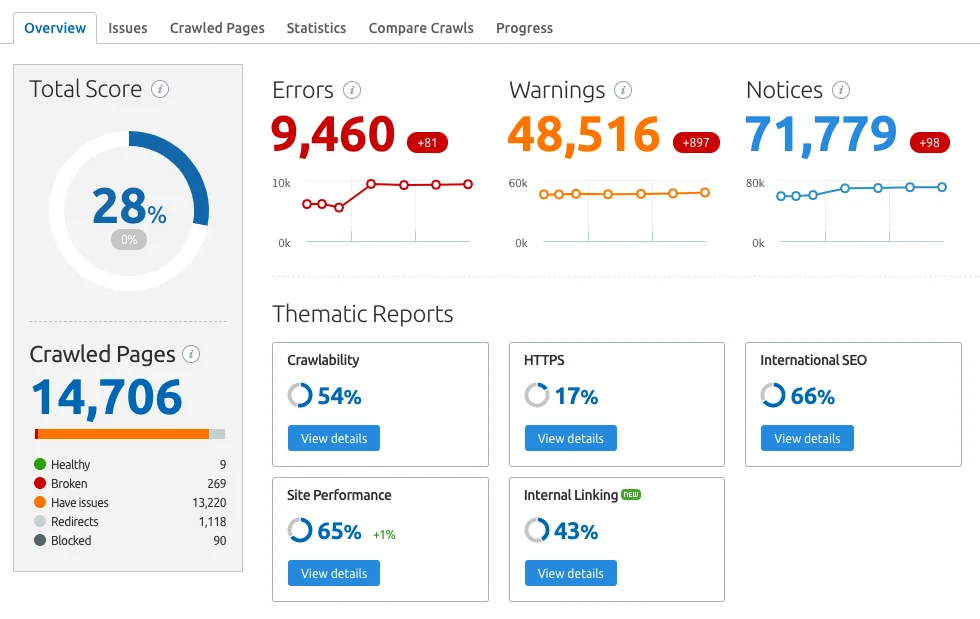
The overview will display the total number of problems detected and an overall health score of the website. You can view the top issues of the website and begin by fixing these. To do this, click on thematic reports or head to the issues tab to view a full list of the issues. The crawled pages tab will also show you how the bot crawls the site and if the architecture functions well.
Google Accessibility
Once the previous steps have been completed, you want to ensure that Googlebot actually has access to your website. Go over to the hostname of your test website and use the Coverage report. Doing this will also make sure JavaScript will be crawlable and indexed.
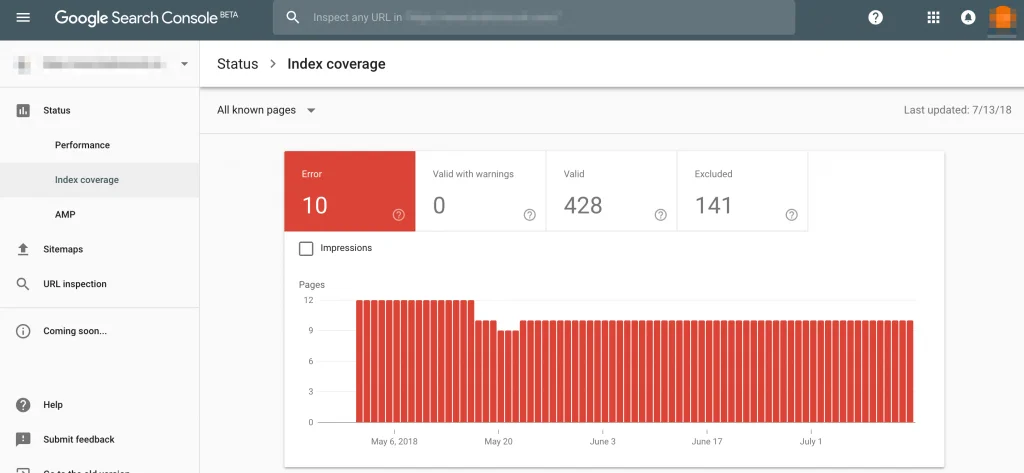
It’s important to note that this access should only be temporary for the time being, and recommend limiting the access after you’ve ensured your test site has no indexing issues.
DNS TTL Values
The majority of your website visitors will use the site name to enter rather than the IP address, but computers will still need IP addresses to serve websites. A DNS or Domain Naming System translates the websites names into IP addresses for you.
Sometimes a website migration may involve a change of IP address, in which your DNS records will need to be updated, resulting in some downtime for your site. In order to minimise this as much as possible, you can adjust the Time-To-Live or TTL values of the DNS entries.
These values will detail how long the DNS record is around for, as there is an expiration date. By lowering the value of TTL prior to the migration, you should increase the speed of the DNS change process. Once the migration is done, the values can be changed back.
Server Performance
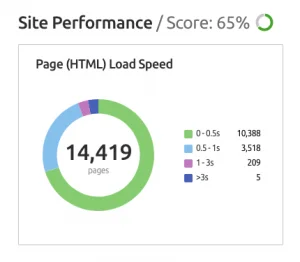
Search engine bots will have to recrawl your new site, so it should be in your best interest for this to be done as soon as possible. These bots will slow down their crawl rate if your server response time is slow, therefore taking a lot longer to recrawl the entire website.
On top of this, it will also negatively impact the overall performance of your website despite any optimisation efforts. To ensure that every single web page loads fast, you can use the Page Load Speed Widget within the SEMrush site audit tool. The chart can be clicked on and a report will be created showing the loading speed range for all the pages.
URL Mapping & 301 Redirects
Once all your URLs have been mapped of both your old and new website, you should be able to detect what pages are missing from the new site. This will help keep your page rank flow and maintain your back link.
For every individual missing page, you need to match this up with a new location on your site. It’s recommended to use a server-side 301 redirect when doing this, in order for the old URLs to be excluded from the index and your redirects will still function when the old website is cancelled.
However, do not redirect all of your missing pages to a single page e.g., using your homepage as the sole location for all redirects. This will confuse both search engines and users, to the point where the search engines may see the page as a ‘soft 404 error’. The most simple and most efficient way is to compare the relevancy of content between the missing page and the new destination. If you don’t need a redirect, then we recommend changing the server response of this page from 404 to 410, which explains the page is permanently deleted and search engines will remove it from their index.
URL Updates
The last step of the migration preparation is to update all the URL details across your site. Here are the steps to follow when doing so:
- Ensure all internal links have been switched to accommodate the new site
- Go through a list of every website linking back to your own and separate the old and new Sitemaps.
- Update HTML or Sitemap annotations
- Change the rel-alternate-hreflang annotations if your website has multilingual pages
- Change the rel-alternatemedia annotations if your website has a mobile version.
- Ensure every URL has a self-referencing rel=”canonical” unless otherwise specified for specific SEO reasons.
Conclusion
Website migrations can have many benefits, including the ability to solve multiple issues on your current site or to completely revamp your online presence and brand. However, it inevitably has many risks involved, everything from losing important content on your website to dropping in search engine rankings. By following a well-thought out plan, you can avoid these risks and have a healthy website migration.


